How to Cook BBQ Chicken Legs in the Oven – Easy Step-by-Step Guide
Look, I know what you’re thinking. “Gus, you’re a pit master — why on earth are you telling me to use my oven?” And honestly? That’s fair. I’ve spent the better part of two decades standing over open flames, nursing smokers through Kansas City winters, and getting that perfect bark on a brisket at 3 AM. But here’s the thing — not every Tuesday night calls for firing up the smoker. Sometimes it’s raining sideways, sometimes the propane’s out, and sometimes you just want killer BBQ chicken legs without turning dinner into a four-hour production.
And I’m here to tell you: your oven can absolutely deliver juicy, fall-off-the-bone BBQ chicken legs with a crispy, caramelized skin that’ll make your neighbors jealous. I stumbled onto this method about eight years ago when a freak ice storm knocked out my restaurant for three days. I had a fridge full of chicken legs and nothing but a home oven. What came out of that oven surprised even me — and I don’t impress easily when it comes to barbecue.
So let’s get into it.
Why Chicken Legs Are the Unsung Hero of BBQ
Before we talk technique, can we just take a moment to appreciate the humble chicken leg? Thighs get all the love on food blogs these days, and sure, they’re great. But chicken legs — drumsticks with the thigh attached — are the whole package. You’ve got dark meat that stays moist even if you overshoot your cook time by a few minutes. You’ve got built-in handles for eating (nature’s original finger food, if you ask me). And you’ve got skin that, when treated right, crisps up like you wouldn’t believe.
They’re also ridiculously affordable. At my local butcher here in KC, I can grab a family pack for next to nothing. When you’re feeding a crowd on a budget — and trust me, with three kids, I’m always feeding a crowd on a budget — chicken legs are your best friend.
What You’ll Need
Ingredients
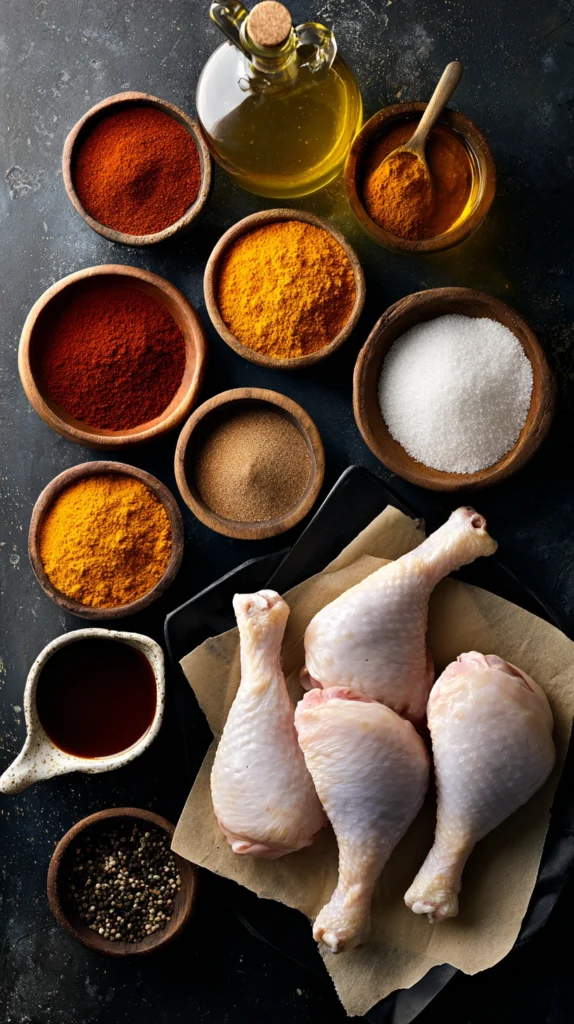
Here’s my go-to lineup for oven BBQ chicken legs that taste like they came straight off the smoker. This serves about 4–6 people, depending on appetites.
| Ingredient | Amount | Notes |
|---|---|---|
| Chicken legs (drumstick + thigh) | 6–8 pieces (about 3–4 lbs) | Skin-on, bone-in — always |
| Olive oil or avocado oil | 2 tablespoons | Helps the rub stick and the skin crisp |
| Your favorite BBQ sauce | 1 cup | I use a Kansas City-style sweet & smoky (see my note below) |
| Smoked paprika | 2 teaspoons | This is the MVP for that smoky flavor |
| Garlic powder | 1 teaspoon | |
| Onion powder | 1 teaspoon | |
| Brown sugar | 1 tablespoon | Dark brown if you’ve got it |
| Chili powder | 1 teaspoon | Adjust to your heat preference |
| Salt | 1½ teaspoons | Kosher salt — always kosher salt |
| Black pepper | 1 teaspoon | Freshly cracked, please |
| Cayenne pepper | ¼ teaspoon | Optional, but I always add it |
| Apple cider vinegar | 1 tablespoon | Just a splash — trust me on this |
A Quick Note on BBQ Sauce
Now, I’m a Kansas City guy through and through, so my BBQ sauce of choice is thick, tomato-based, and has that beautiful sweet-smoky thing going on. But here’s my honest opinion after years of judging competitions: the best BBQ sauce is the one you like. Carolina mustard-based? Go for it. Alabama white sauce? Absolutely. That spicy Texas mop sauce your uncle makes? Bring it on. The rub does the heavy lifting on flavor here — the sauce is just the finishing touch.
If you want to make a quick homemade sauce, mix together ½ cup ketchup, 2 tablespoons brown sugar, 1 tablespoon apple cider vinegar, 1 tablespoon Worcestershire sauce, 1 teaspoon smoked paprika, ½ teaspoon garlic powder, and a pinch of cayenne. Simmer it on the stove for about 10 minutes. It won’t change your life, but it’ll beat most of the stuff in a squeeze bottle at the grocery store.
Equipment
You don’t need anything fancy here, which is kind of the whole point:
| Equipment | Why You Need It |
|---|---|
| Sheet pan / baking sheet | Your workhorse — line it with foil for easy cleanup |
| Wire cooling rack | Set this on top of the sheet pan so the chicken cooks evenly and the skin crisps on all sides |
| Instant-read meat thermometer | Non-negotiable. If you don’t own one, today’s the day. They’re like $12 and they’ll change your cooking forever |
| Mixing bowl | For tossing the chicken with the rub |
| Basting brush | For that final BBQ sauce glaze |
The Step-by-Step Method
Alright, here’s where the magic happens. I’m going to walk you through this the way I’d walk a friend through it if they were standing in my kitchen — tangents and all.
Step 1: Prep the Chicken (5 Minutes)
Pull your chicken legs out of the fridge about 30 minutes before you plan to cook them. I know, I know — every recipe says this and nobody does it. But bringing the meat closer to room temperature really does help it cook more evenly. While you’re waiting, go ahead and preheat your oven to 400°F (200°C).
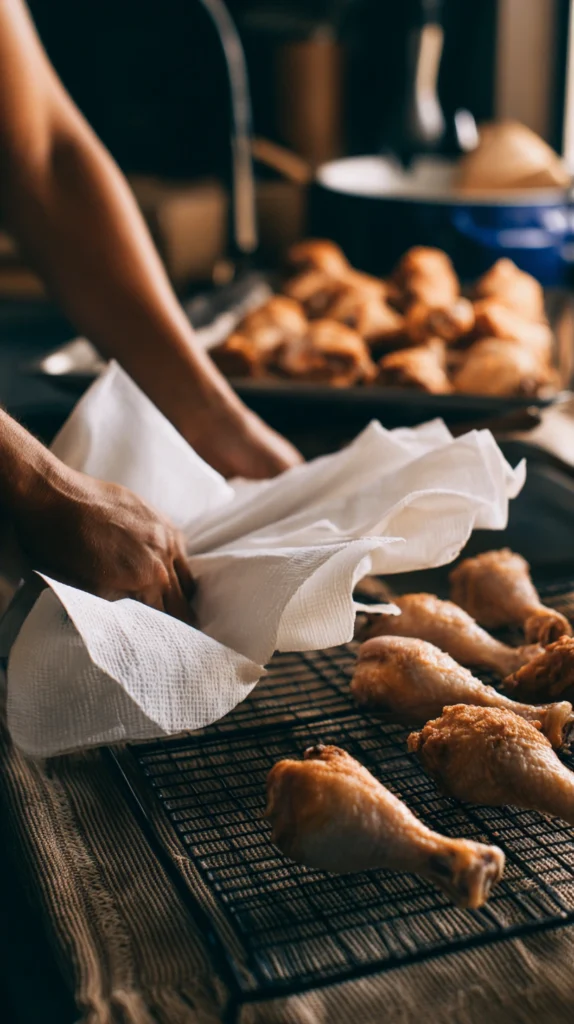
Pat the chicken legs dry with paper towels. And I mean really dry them. Both sides, get in the crevices, be thorough about it. This is probably the single most important step for getting crispy skin in the oven. Moisture is the enemy of crispiness — it’s basic science, and it’s the one thing I see home cooks skip every single time.
Step 2: Mix and Apply the Dry Rub (5 Minutes)
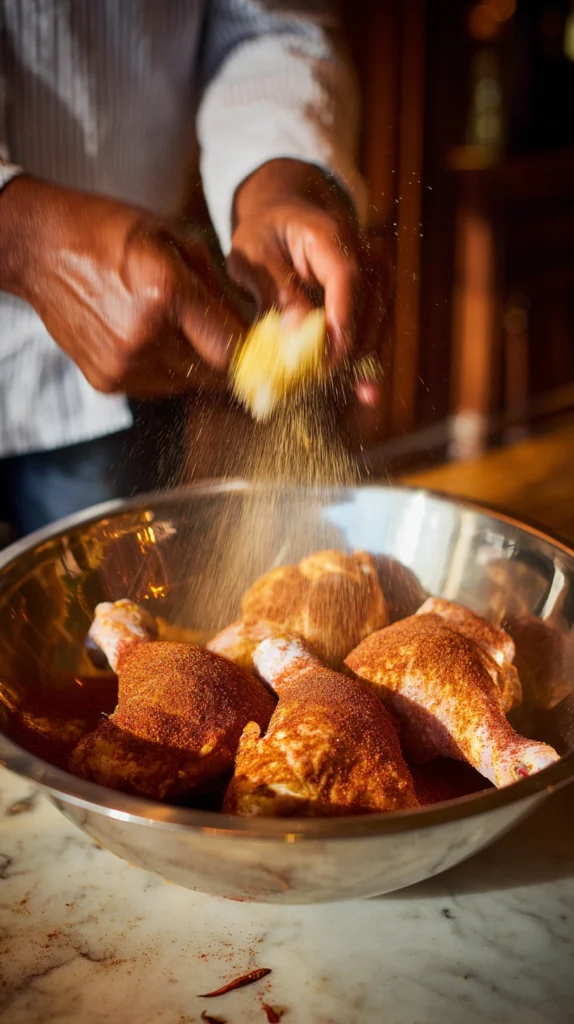
In a small bowl, combine your smoked paprika, garlic powder, onion powder, brown sugar, chili powder, salt, black pepper, and cayenne. Give it a good stir.
Toss the chicken legs in a large bowl with the olive oil — just enough to give them a light coating. Then sprinkle on the dry rub and work it in with your hands. Get it under the skin if you can. Don’t be shy — really massage it in there. I tell my kitchen crew at the restaurant: “Season it like you mean it.” If you’re timid with seasoning, you’ll get timid results.
Here’s a little pit master trick I learned early in my career: after you’ve rubbed the chicken down, let it sit on the wire rack for about 10–15 minutes while the oven finishes preheating. The salt in the rub starts to draw out a tiny bit of surface moisture, which then gets reabsorbed into the meat along with all those beautiful spices. It’s like a mini dry brine, and it makes a noticeable difference.
Step 3: The Initial Bake — Low and Slow-ish (35–40 Minutes)
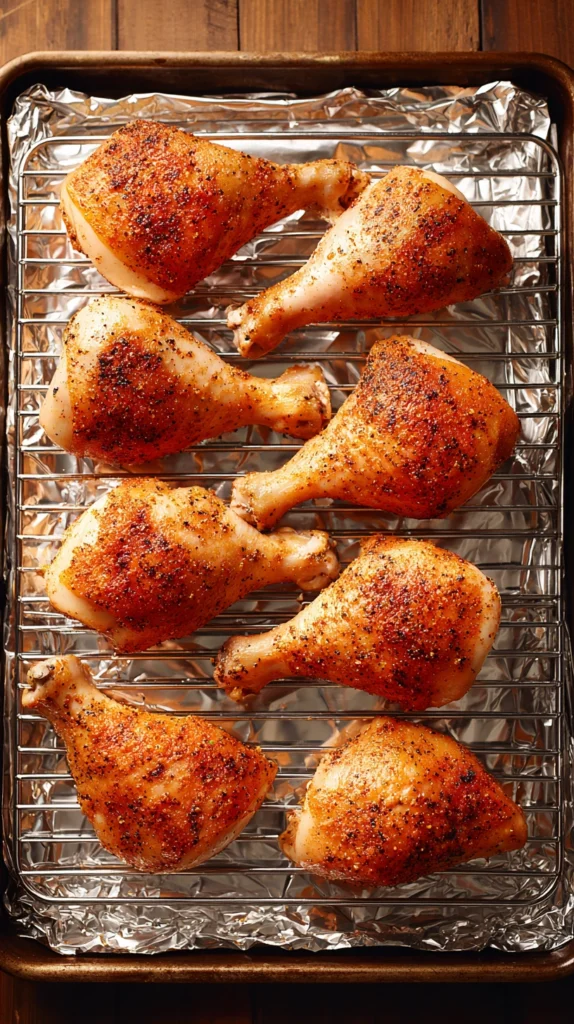
Place your wire rack on top of the foil-lined sheet pan, arrange the chicken legs skin-side up with a little space between each piece, and slide them into the middle rack of your oven.
Now here’s where my method differs from a lot of recipes you’ll find online. A lot of folks will tell you to crank the oven to 425°F or even 450°F from the start. And yeah, that works — sort of. But after years of testing, I’ve found that starting at 400°F for 35–40 minutes gives you a much more even cook. The meat has time to come up to temperature gradually, which means juicier results. Think of it like the oven equivalent of the “low and slow” philosophy we use in smoking. Not as low and slow, obviously, but the principle is the same: patience pays off.
During this phase, just leave the chicken alone. No peeking, no poking, no rotating the pan. Every time you open that oven door, you lose heat and extend the cook time. Go set the table, pour yourself a drink, argue with your kids about homework — whatever you need to do for 35 minutes.
Step 4: Sauce It Up (The Fun Part)
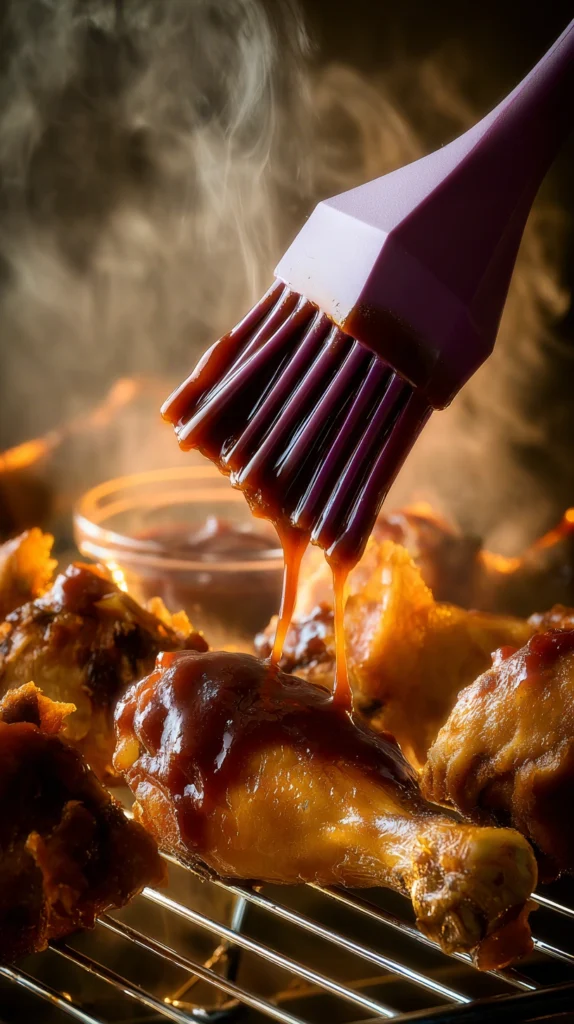
After 35–40 minutes, pull the chicken out and check the internal temperature. You’re looking for about 165°F (74°C) in the thickest part of the thigh, not touching the bone. If you’re not there yet, give it another 5–10 minutes and check again. No shame in that — every oven runs a little different.
Once you’ve hit temp (or you’re close — like 160°F), it’s BBQ sauce time. This is where the kitchen starts smelling incredible. Using your basting brush, lay down a generous coat of BBQ sauce on each piece. Don’t just dab — really paint it on there. Flip ’em over, sauce the other side, then flip back to skin-side up and hit the top with one more coat.
The Broiler Finish
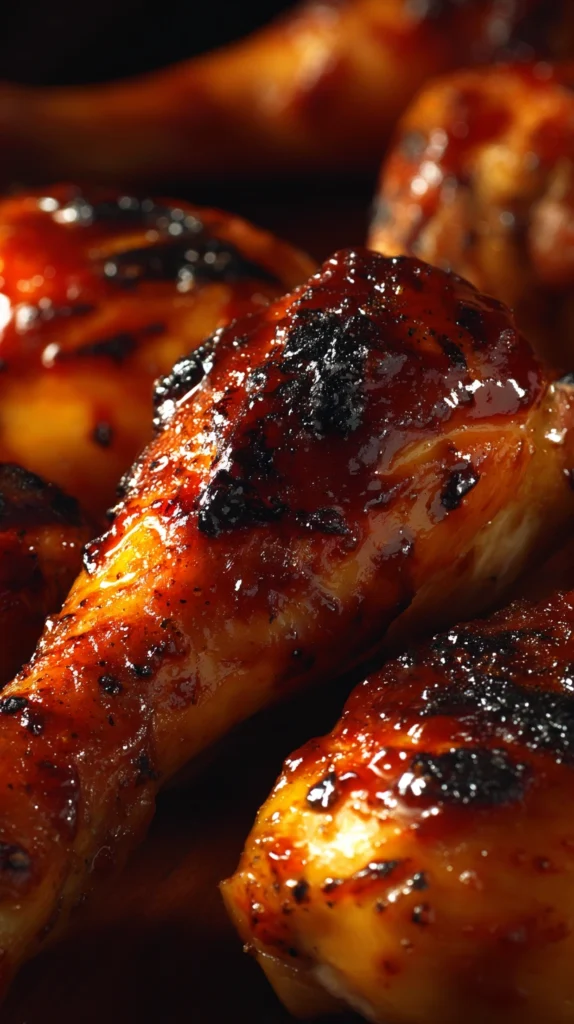
Now — and this is the secret weapon, the move that takes this from “pretty good oven chicken” to “wait, this didn’t come off a grill?” — switch your oven to broil on high. Slide the chicken back in on the upper rack, about 6 inches from the broiler element, and watch it like a hawk.
I mean it. Do not walk away. Do not check your phone. The broiler is basically an upside-down grill, and things go from “perfect caramelization” to “charcoal briquette” in about 90 seconds.
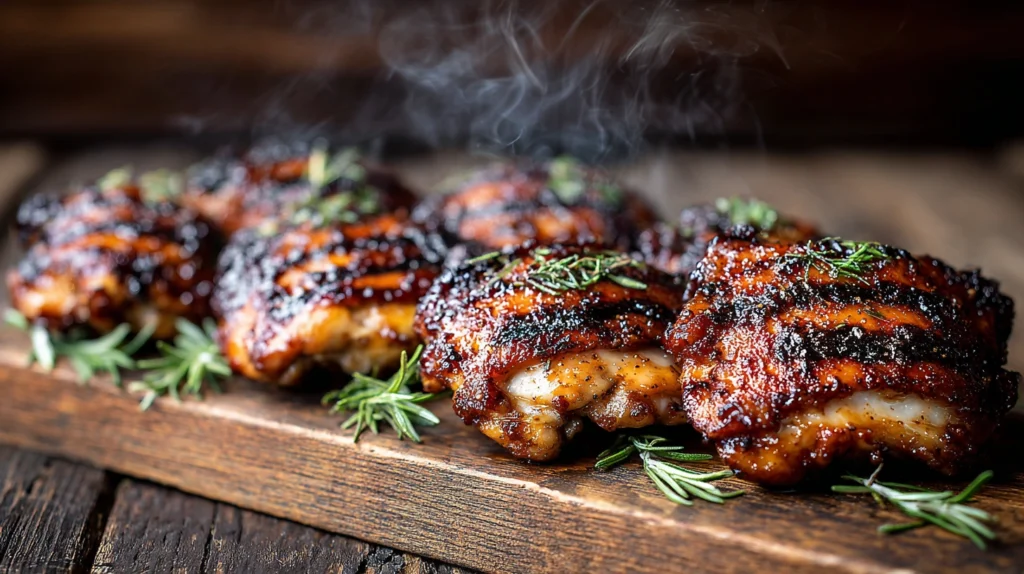
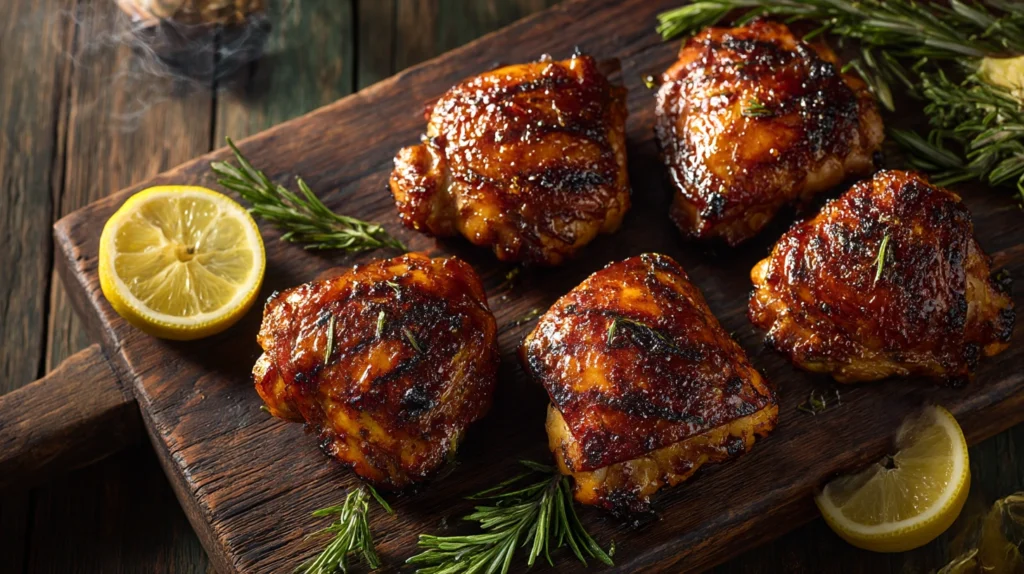
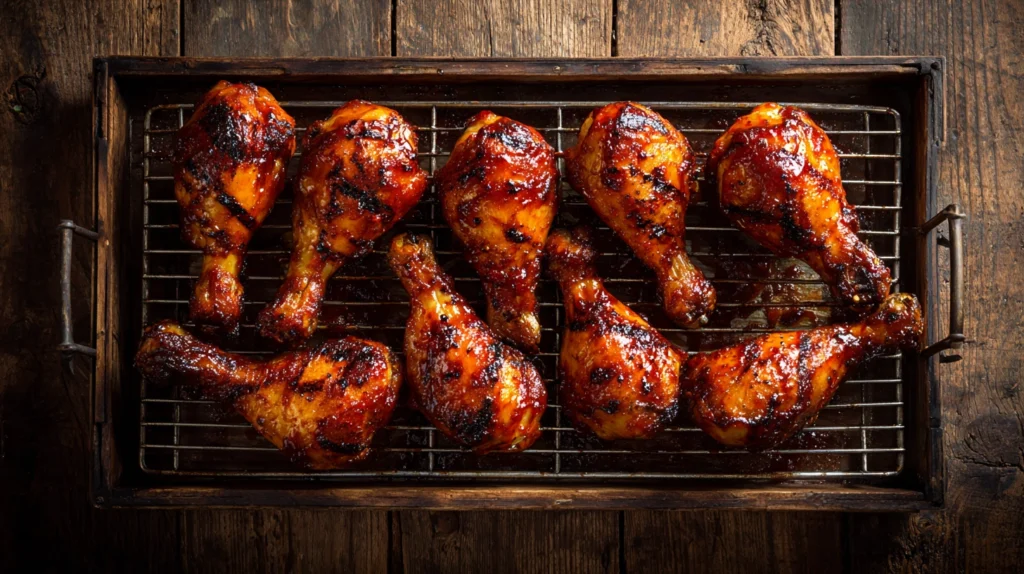
You want 2–4 minutes under the broiler, just until the sauce gets bubbly, sticky, and slightly charred in spots. Those little charred edges? That’s where all the magic lives. That’s what makes people say “are you sure this was made in the oven?”
Step 5: Rest and Serve (5–10 Minutes)
Pull the chicken out, and for the love of all that is holy, let it rest for at least 5 minutes before you dig in. I know the smell is driving you crazy. I know the kids are circling like little vultures. But resting lets the juices redistribute throughout the meat, and if you cut into it too early, all that moisture just runs out onto the plate.
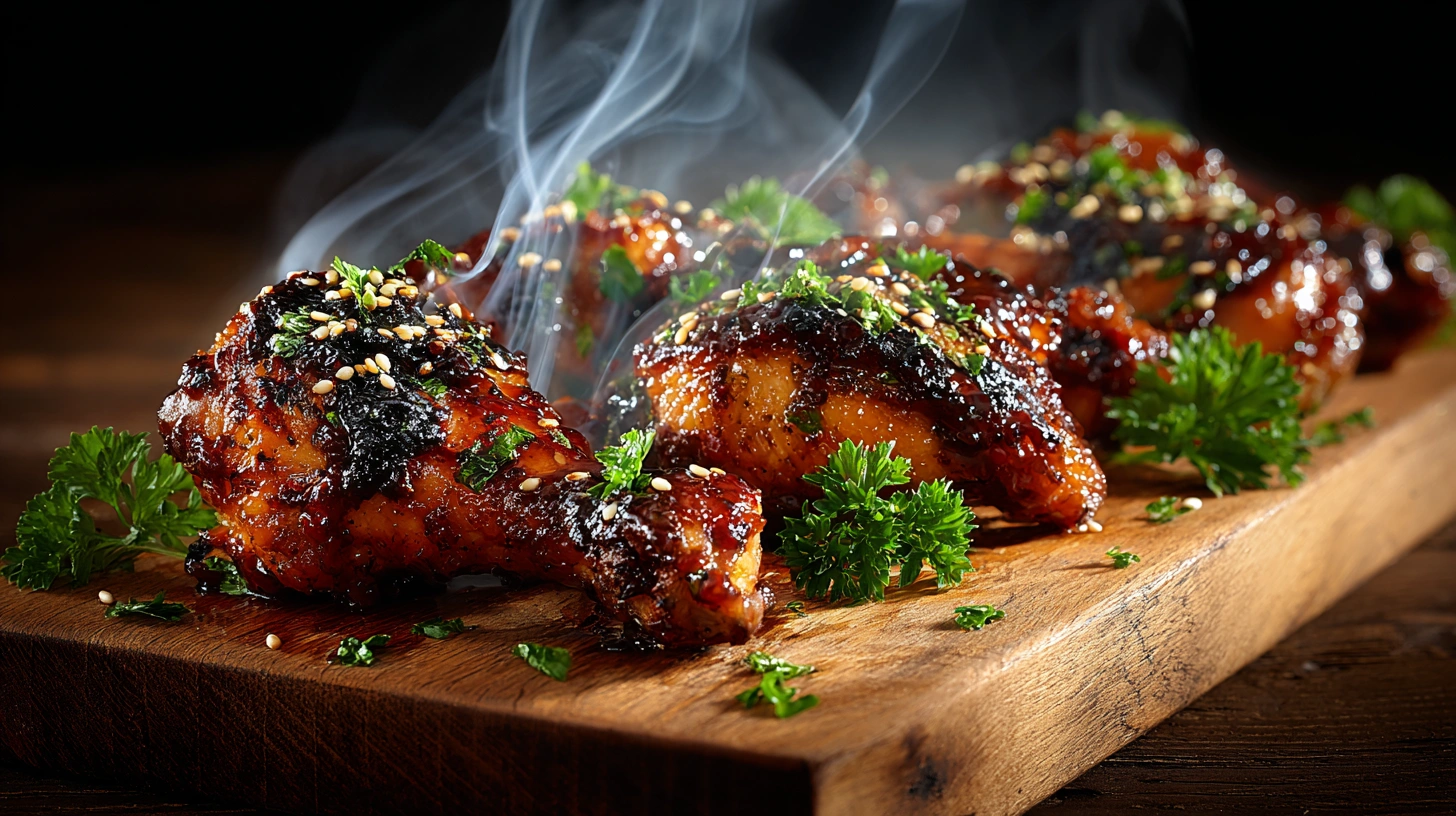
After resting, I like to hit it with one more light brush of fresh sauce — this gives you a layer that’s bright and glossy on top of that caramelized layer underneath. It’s a two-texture thing that just works beautifully.
Quick-Reference Cook Times
Here’s a handy table so you can reference this without scrolling through my stories:
| Step | Temperature | Time | What to Do |
|---|---|---|---|
| Bring to room temp | Room temp | 30 min | Pat dry, apply rub |
| Initial bake | 400°F (200°C) | 35–40 min | Skin-side up, don’t touch |
| Sauce & finish | Broil (high) | 2–4 min | Sauce generously, watch closely |
| Rest | — | 5–10 min | Hands off! Let juices settle |
| Total | ~50–55 min active cook time |
Pro Tips From 20 Years Behind the Grill
Alright, here’s the stuff that separates good from great. These are lessons I’ve picked up over two decades of cooking professionally, competing in BBQ competitions across the Midwest, and honestly just making a lot of mistakes in my own kitchen.
Tip 1: The Paper Towel Trick
I mentioned patting dry earlier, but here’s what I do at the restaurant: after patting the chicken dry, I lay the pieces on a wire rack in the fridge, uncovered, for a few hours (or even overnight if I’m prepping ahead). The cold, dry air of the fridge works wonders on the skin, almost like a passive dehydrator. When that ultra-dry skin hits the hot oven, it crisps up like nobody’s business.
Tip 2: Don’t Fear the Dark Meat Temperature
Here’s something they don’t teach you in most home cooking classes. While 165°F is the safe temperature for chicken, dark meat actually tastes better at 175–185°F. I know that sounds crazy, but all that connective tissue in legs and thighs needs a higher temperature to break down into gelatin. That’s what gives you that fall-off-the-bone, almost pulled-pork texture. So if your thermometer reads 175°F, don’t panic — celebrate. You’re right where you want to be.
Tip 3: Add Some Smoke Without a Smoker
Miss that smoky flavor? Besides smoked paprika in the rub (which does a lot of the heavy lifting), try adding a teaspoon of liquid smoke to your BBQ sauce. I know liquid smoke gets a bad rap in some barbecue circles — and yeah, if you dump half a bottle in, it tastes like a chemistry experiment. But a restrained amount? It’s honestly not that different from the real thing. Chipotle powder in the rub is another great option — it’s basically smoked jalapeño, so you get smoke and a nice little heat bump.
Tip 4: Sauce Layering
This is competition-level stuff that’s dead simple to do at home. Instead of one thick coat of sauce, do two thin coats. Apply the first coat, broil for 2 minutes, then pull it out, apply a second coat, and broil for another 1–2 minutes. You get this incredible lacquered, multi-dimensional glaze that has more depth than a single coating ever could.
Tip 5: The Sheet Pan Situation
Line your sheet pan with foil and use a wire rack. I cannot stress this enough. Without the rack, the bottom of the chicken sits in its own rendered fat and juices, and the skin on the bottom turns into a soggy, flabby mess. The wire rack elevates the chicken so hot air circulates on all sides. It’s the difference between “oven-baked chicken” and “oven-baked chicken that someone might actually believe came off a grill.”
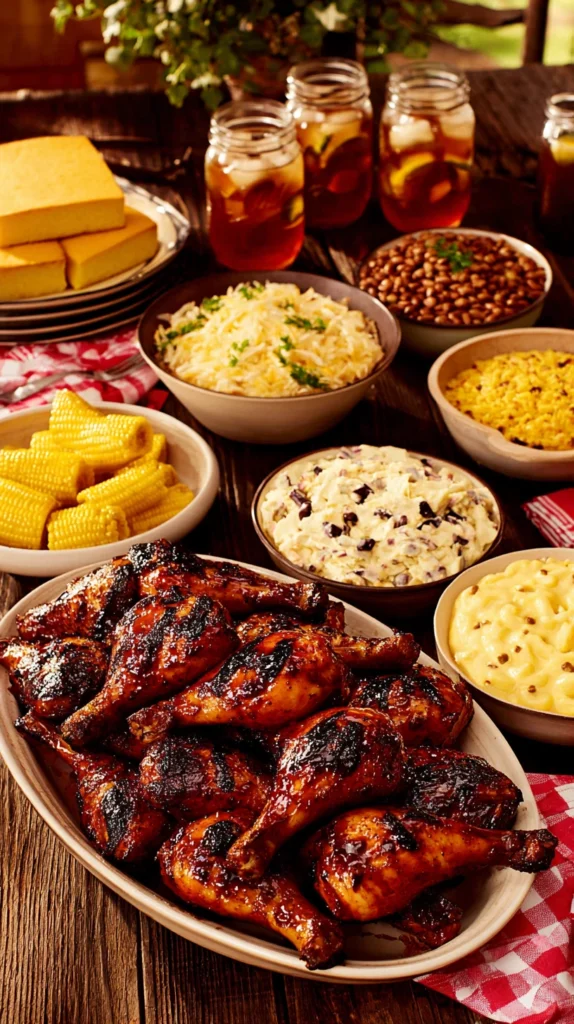
What to Serve With BBQ Chicken Legs
No BBQ plate is complete without sides, and I could honestly write a whole separate article on this (and maybe I will). But here are my go-to pairings:
| Side Dish | Why It Works |
|---|---|
| Classic coleslaw | The cool crunch cuts through the rich, smoky chicken perfectly |
| Cornbread | Sweet, buttery, and basically mandatory at any BBQ in my book |
| Baked beans | A Kansas City staple — slow-cooked with molasses and a little bit of that same BBQ sauce |
| Mac and cheese | Because it’s mac and cheese. It goes with everything. Fight me |
| Grilled corn on the cob | Even if the chicken came from the oven, throw the corn on the grill for that charred flavor |
| Potato salad | My grandma’s recipe, which I will take to my grave (sorry, readers) |
Storing and Reheating Leftovers
If you somehow have leftovers — and with my family, that’s a big “if” — here’s how to handle them:
Storage: Let the chicken cool completely, then store in an airtight container in the fridge. It’ll keep for 3–4 days. I wouldn’t push it past that.
Reheating: This is where most people ruin perfectly good leftover chicken. Please, I’m begging you, do not microwave BBQ chicken legs. You’ll get rubbery skin and unevenly heated meat. Instead, preheat your oven to 350°F, place the legs on a wire rack (sound familiar?), and warm them for about 15–20 minutes. Brush on a little fresh sauce in the last 5 minutes. They won’t be quite as good as fresh, but they’ll be close — and miles ahead of the microwave version.
Freezing: You can freeze cooked BBQ chicken legs for up to 3 months. Wrap individually in plastic wrap, then foil, then into a freezer bag. Thaw overnight in the fridge before reheating using the oven method above.
Frequently Asked Questions
Can I use just drumsticks instead of full chicken legs?
Absolutely. Drumsticks cook a little faster — more like 25–30 minutes at 400°F before the broiler step — so just keep an eye on your thermometer. Everything else stays the same.
What if I don’t have a wire rack?
You can cook directly on a foil-lined sheet pan. The chicken will still taste great, but the skin on the bottom won’t crisp up. To compensate, flip the pieces halfway through the initial bake.
Can I marinate the chicken beforehand?
You can, but honestly, with this dry rub method, I don’t think you need to. The rub plus the sauce gives you plenty of flavor. If you really want to marinate, go for it — just pat the chicken dry before applying the rub so you still get that crispy skin.
How do I know when the chicken is done without a thermometer?
Okay, real talk: get a thermometer. But if you’re in a pinch, look for juices that run clear (not pink) when you pierce the thickest part, and the meat should pull away easily from the bone. The leg should wiggle freely in the joint. But seriously — thermometer. Twelve dollars. Life-changing.
Now Get in That Kitchen
So there you have it — my complete guide to cooking BBQ chicken legs in the oven that taste like they came straight off the smoker. It’s one of those recipes I keep coming back to because it’s dead simple, it feeds a crowd, and it delivers every single time. Even my buddy Rick — who is the most obnoxious grill purist I know and once told me oven-cooked BBQ “doesn’t count” — admitted these were pretty darn good. (He said it quietly, when he thought nobody was listening. But I heard him. And Rick, if you’re reading this: I heard you.)
The secret, like most things in barbecue, isn’t some fancy ingredient or expensive equipment. It’s just taking a few extra minutes to do the basics right. Dry the chicken. Season it generously. Let the oven do its thing. Sauce at the right time. Finish under the broiler. Rest before serving.
That’s it. That’s the whole secret.
Now fire up that oven, get your hands dirty, and make something delicious. I believe in you — and your kitchen is about to smell absolutely incredible.
Happy cooking, friends. 🔥